Viewing a SimplySNAP Installation in Map View
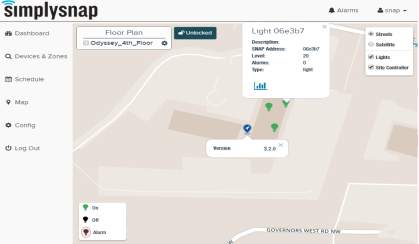 For sites with an active Internet connection, SimplySNAP provides a background map based on the latitude and longitude of the site controller. The Map view may be configured for a street map style view, or a satellite image of your SimplySNAP location. You may also choose to show lights and site controllers on the map, or eliminate one or both device types as you desire.
For installations where an active Internet connection won't be available, you can still download a map and store it on the controller and get the same effect. For more information on how to do this, see Location & Time
The Map view can be locked and unlocked using the Lock/Unlock button at the top of the screen. Setting the button to the Lock state prevents users from accidentally repositioning lights during normal use. When set to the Unlock state, you can reposition any light configured with a latitude and longitude by dragging and dropping it on the Map view.
Lights that have been added to the Map view using the Edit Light function can be repositioned by dragging and dropping provided the page is unlocked.
View options can be configured by clicking the Layers button in the upper right corner of the Map and selecting your desired level of detail. Lighting icons indicate the status of each of the lights, including which ones are on, off, or in an alarm state. You can also get details of a specific light by clicking the bar chart icon in the lower left of the light status display.
Adding a Custom Floor Plan to the Map
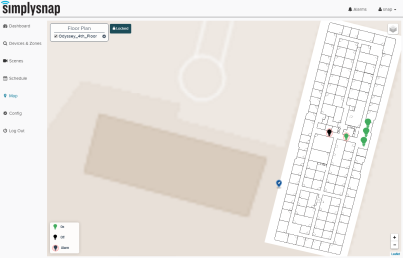 If you'd like more specific detail for your maps page, you can upload a custom floor plan image in .PNG, .GIF, or.JPG format. This image is placed on top of the maps image to allow you to take maximum advantage of the feature.
To upload a custom floor plan:
- Click the Map icon in the left menu bar to display the currently configured map. This will be based on your latitude and longitude settings from the Site Controller Location area at Config - Location & Time.
- Click the Add Floor Plan button and select the image you want to upload, then click Open. The image will appear superimposed on the current map image.
- Use the red circles at the corner of your image to rotate and size it appropriately to where you want it to appear on the map, then click Save Floor Plan.
Editing or Deleting a Custom Floor Plan
You can turn the custom floor plan image on and off using the check box to the left of the floor plan name. If you'd like to reposition the image within the maps view, you can accomplish it using the instructions below.
To edit or delete a custom floor plan:
- Click the Map icon in the left menu bar to display the currently configured map.
- Click the Gear icon to the right of the custom floor plan image name.
- Reposition the image as necessary, then click the Save Floor Plan button. You can also delete the image using the Delete Floor Plan button in the top right of the screen.