Using the Android Lighting Installer App
The easiest way to get a SimplySNAP installation off to a good start is through the use of the Synapse Lighting Installer app. The lighting installer runs on the Android platform, simplifies the configuration of a SimplySNAP system by easily capturing essential light controller information along with the geographic location of the light. The information is collected using QR codes provided on Synapse lighting controllers. Geographic location is determined using the Android device GPS (if available) and this information is used to locate the light on a map of your installation.
NOTE: The GPS function is primarily intended for outdoor use. While it can still be used indoors, the mapping functionality will likely be limited due to lack of a GPS signal. The mapping feature requires an Internet connection during setup.
The Lighting Installer app is used in two distinct stages.
Collecting Light Information
In the first stage sites are created, then lights are scanned and associated to a site. Once this is complete you upload the collected information to the SimplySNAP Site Controller.
You don’t have to upload information immediately. One of the benefits of the app is ability to capture the light information before the SimplySNAP system is setup.
Uploading Light Information
The second stage begins after initial setup of the SimplySNAP Site Controller. In this stage you upload all the light information you captured in Stage 1 and the SimplySNAP system will do the rest!
Collecting Light Information Using the Lighting Installer App
When you're ready to get started, download and install the Synapse Lighting Installer App from the Google Play store. After you first launch the Lighting Installer app, you will need to activate it with the code provided by Synapse. When the app first launches, enter the code and continue.
The Lighting Installer app consists of three main areas, the site list, the individual site pages, and light details pages.
Site List
The site list is the first thing you see when you open the app, and it contains a list of all of your currently active sites. From here you can rename or delete sites, and export all lights from each site.
Individual Site Page
Each site is detailed on a page containing a list of all lights scanned into that site, as well as a map view of the site with light locations displayed. Lights that are represented with orange icons are eligible for modification and export, while lights with gray icons have already been exported and cannot be further modified.
Light Details Page
Each light has a page that includes all vital stats, export errors, and the map location for that light. From this page you can modify light location, MAC address, and controller type. You can also choose to rename, delete or export the light.
Adding Sites
The Lighting Installer app allows you to store multiple lighting sites at once. This lets you scan and store light information at any of your project sites and then upload it at your convenience.
NOTE: Site information is not uploaded to the site controller. Sites are configured within their individual interfaces, and site information within the app is for local informational purposes only.
To add a site: 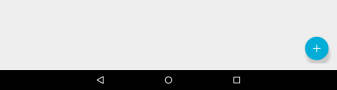
- Click the action button on the bottom right of the screen. A dialog box will appear prompting you to name and describe the site.
NOTE: When you open the app for the first time you will be prompted to create a new site.
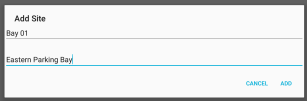
- Start by entering a name for your site. We encourage creativity, but you can name it “Site 1” or whatever, if you like.
- While not required, you can enter a site description to help you remember the details of the site.
- Click Add and your new site will be created. Once you’ve created a site, you can start scanning lights!
Adding Lights to a Site
Once the site is created, you can start scanning in the lights that will make up that site. This is accomplished using the camera on the Android device, and the QR codes conveniently located on each Synapse lighting controller. (If don’t have a code to scan, you should skip to the Manual Add section.)
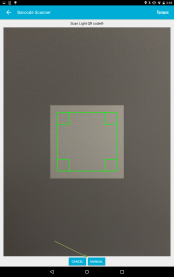
Using the QR Code Scanner
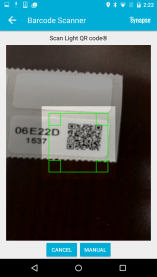
When you tap the action button the screen will change to a QR code scanner. Once the scanner is loaded, simply scan the QR code associated with the first light. You can do this by roughly aligning the white square with the QR code you wish to scan. The scanner will automatically lock on to the code and scan it, so don’t worry about pushing any buttons.
NOTE: The speed of scanning is dependent on the quality of your mobile device’s camera and the ambient lighting. If your device doesn’t have auto focus, you may need to use the CSV import or manual methods for entry. For more details, see Importing and Exporting Light Configurations using a .CSV File
To add a light:
- Tap the site name for the site where the light is being added and the site page will open.
- Click the action button on the bottom right of the screen.
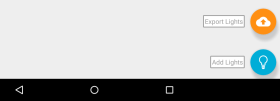
- Click the Add Lights button and the QR Code Scanner will launch.
- Scan the QR code for the light you're installing.
Click Scan Next if you need to add more lights or Done if you are finished.
Manually Adding a Light Within The App
 If you don’t have a QR code for your lighting controller or device is having trouble scanning, you can add the light manually.
- If you don’t have a QR code, you can manually add the light by clicking the Manual button.
- Select the Controller Type.
- Enter the MAC Address.
- Enter the Latitude and Longitude (optional).
- Click Scan Next if you need to add more lights or Done if you are finished.
Once finished, you will be returned to the site page where you will see a new light has been placed in your light list. You can always add more lights using the trusty action button as before.
Uploading Scanned Lights to SimplySNAP
Now you need to connect to SimplySNAP. First, connect the SimplySNAP Site Controller to power using the instructions outlined in Installation and Initial Setup
Next you'll need to access the site controller using the instructions outlined in When you've connected and logged in, you'll be ready to upload the scanned lights.
There are two ways to export lights:
Option 1
Use the action button on the bottom right of the light list.
- Tap the Action button to see options for exporting lights.
- A dialog box will appear asking you to confirm. If you are confident in your decision, click EXPORT and the light information will be transferred to the site controller.
After the export, you will see a dialog confirming export success or detailing any export failures. Successfully exported lights will turn gray to indicate that they have been exported. You can no longer modify that light because it's now configured from within the SimplySNAP system.
NOTE: In the event of an export failure, the lights that failed to export will be displayed in red on the map, and will be marked with an error icon in the light list. You can learn more about the errors by tapping on the light in the list to activate the light details page. The error message will be contained in a field at the bottom of the page and will be marked with a red error icon.
Option 2
The second way to export lights is from the site list page. Sites with lights available for export will have an orange light bulb icon next to the name. To export lights in this fashion:
- Tap the triple dot icon at on the far right of the site name to activate a list of actions at the bottom of the screen.
- The first action on the list is Export Lights. Select that option to send your lights on their way.
Exporting a Single Light
Sometimes you may need to export only one light at a time. Don’t worry, this is pretty simple to do.
All you need to do is select the light from the light list or tap on it from the map to open the details page for that light.
To export a single light:
- Below the light name tap the export option to send the light to the site controller.
- Once this happens you will see a dialog confirming that the export process is happening, followed by a confirmation of export or notification of an error.
Renaming a Site
If you aren’t happy with the name of a site, (maybe you named it “Site 1” or something non-descriptive,) it's easy enough to change it.
To rename a site:
- Tap the triple dot icon next to the site name.
- Select the Rename option from the list of actions at the bottom of the screen.
- Enter the new site name and description in this fields provided, and click the OK button to confirm the name change, or click the Cancel button to exit without renaming the site.
After confirming the new name you will see the change reflected in the site list.
Deleting a Site
Sometimes things just don't work out, and it's time to say good-bye to a site.
To delete a site:
- Tap the triple dot icon on the right of the site name.
- Select the Delete Site option from the list of actions that appear at the bottom of the screen.
- Confirm that you really want to say goodbye to that site, just in case you change your mind. Once you say yes, the site will be gone from your life forever.
Moving a Light
When you a scan a light into the system, the app uses the built in GPS in your mobile device to automatically place the light wherever you are standing. Sometimes this might not be where the light actually needs to be located, but don’t stress, we’ve got you covered.
To move a light:
- Select the light from the light list or tap on it from the map to open the details page for that light.
- Tap the light's icon on the map. The icon will change to a movement arrow.
- Drag the light to its new location and drop it where it needs to be and the light’s location will be automatically updated.
Renaming a Light
If you need to change a light name, select the light from the light list or tap on it from the map. This will open the details page for that light.
- Select the Rename option from the list of actions at the bottom of the screen.
- Enter the new light name and description in the fields provided, and click the OK button to confirm the name change, or click the Cancel button to exit without renaming the light.