Adding Lights
To manually add a light, access the SimplySNAP dashboard and then click the Devices & Zones menu choice in the Left Menu Bar.
NOTE: If you are using the Lighting Installer app, this information will be provided by the app.
NOTE: If you are adding a new light or sensor to an existing SimplySNAP installation, you'll first need to change the installation's channel, network ID, and encryption settings back to their default values. This can be accomplished by clicking Config in the left menu bar, and then selecting the Network Settings tab. The default settings are Channel:1, Network ID: d110, and encryption and storm supression disabled. Once the new light is added, you'll want to change the settings back to your chosen settings and off default.
To add a new light:
- Click the Devices & Zones menu choice in the left menu panel, then click the Add Light Icon near the top of the page.
- Enter the desired name for the light, the SNAP Address for the light controller and the controller type into the provided fields. This information is required as a minimum. Other information may be entered as desired including a description, the zones the light will be included in, light location, etc. You can also position a light using the map view by clicking and dragging the light bulb icon to reposition the light. (Fields are summarized in Information Fields for Lights and Sensors)
-
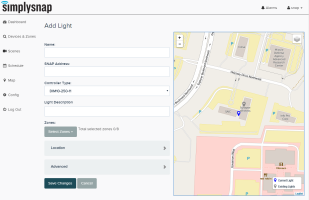 Click the Save Changes button to save, or the Cancel button to exit without saving changes. On a successful save, a green light panel for the newly added light will appear in the content area of the display.
Each light is added individually by invoking this dialog to add additional lights. When all lights are entered, SimplySNAP will verify that your lighting controller(s) software is up-to-date, and update the controller(s) if necessary. SimplySNAP will then be ready to control your lighting system.
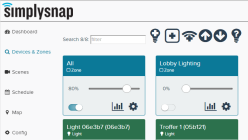
When a light is entered, it can be controlled from the Lights and Zones page. All lights can be controlled by clicking the On/Off switch on the blue "All" zone icon or dragging the slider to a specific illumination level.
Each individual light may be controlled similarly by clicking the On/Off switch on the green icon for each individual light or dragging the slider to create a specific brightness level for each light.