You're reading: SimplySNAP Online Help > Installation/Initial Setup > Setting up the SimplySNAP Site Controller
Setting up the SimplySNAP Site Controller
The first step in installing a SimplySNAP lighting solution is to connect the physical hardware of the system, followed by configuration of the system within the SimplySNAP user interface. These instructions assume that you have already physically installed the hardware that will make up your SimplySNAP lighting solution and you are now ready to connect the site controller.
To install the SimplySNAP site controller:
- Unpack the SimplySNAP Site Controller.
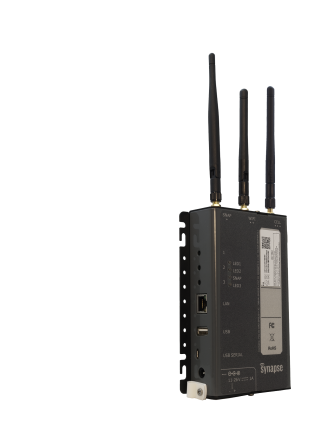
- Attach the included antennas to the site controller as shown. When looking at the top of the site controller (with the mounting bracket on the back side), the longest antenna (SNAP antenna) attaches to the left-most antenna connector, and the shorter Wi-Fi antenna attaches to the middle connector. If the site controller that you're installing has cellular capability, the optional cell antenna is attached to the remaining connector.
Synapse-provided antennas will have white dots at the base of the antenna that denote the type. One dot is a SNAP antenna, two is for a Wi-Fi antenna, and three is for a cellular antenna. This notation is also reflected on the front unit label of the site controller. - Plug the provided power supply into the barrel connector and then into an 110VAC outlet. When the SimplySNAP Site Controller powers up, orange LEDs will light up for approximately 30 seconds while the site controller software starts up. Once this is complete, the orange LEDs will turn off and the site controller will be ready to use.